
Invert Text Over A Background Or Image
Invert Text Over A Background Or Image Elementor Pro
Hi guys in this Tutorial I’m going to show you how to invert your text as you scroll over images and backgrounds in Elementor. It’s extremely easy to do because I’ve done all the hard work for you, so don’t forget to hit that like And subscribe button, and let’s get into the Tutorial.
Setting Up the Page with a Heading Widget
Okay guys the first thing we’re going to do is set up our page, and to do that I’m simply going to drag in a heading widget, and I’m going to add our text. I’ve already copied the text that I want to add into this box, so I’m going to right click, and paste it in. The next thing I’m going to do is add a column underneath, and in this column I’m going to drag in a spacer.
Adding a Spacer Widget
Now how you use this is totally up to you. I’m just trying to make sure you get the full impact of what you can do with this bit of code. You might not want this to be a column with a spacer. You might want it just to be another section on your page, so now I’m going to add the column, and drop in a spacing widget. I’m also going to set its height on the left hand side.

Duplicating Columns for Colour Variation
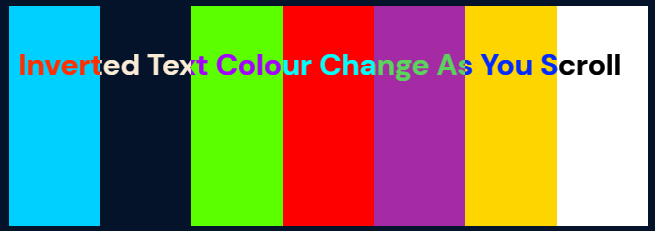
Once that’s done I’m going to duplicate this column, and to do that you right click in the left hand side of the column, and click on duplicate. For the purpose of this video I am going to make lots of duplicates, and the reason why I’m doing that is because I want to show you that the text colour will change with each column. Each column is going to have its own background colour, and as scroll down the page the text will change colour over each one.
Exploring Sticky Text and Background Options
Now I am going to be showing you how to make the text sticky to top. You don’t have to do this. You could just have a multi-coloured background, and instead of having spaces you could have the text fixed across that background, and just adjust the padding of the text. Now all that’s done I’m going to add a second section with an image. Now I should have picked a section with two columns, but I actually only picked the one.
Adding an Image to a Duplicated Column
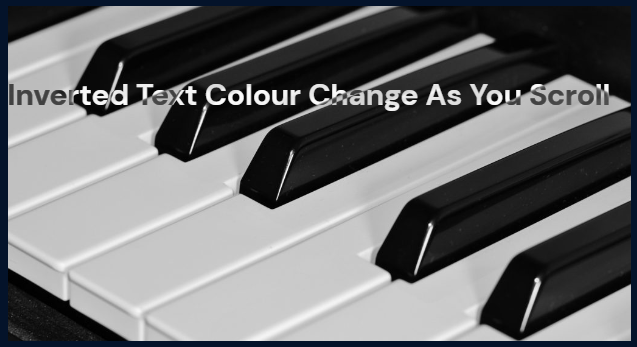
So like before I’m going to click in the top left hand side of the column, and click on duplicate, and it’s in this First Column I’m going to add an image widget, and this image is going to be black, and white, so I’m going to click the add image button, and select the piano keys, and click on insert. Like I said before this could be the hero image of your page, or you could have this set as a background.
Making the Section Sticky
Before I show you how to make the section sticky I’m going to add a spacing widget, and I do that by clicking on the menu Widget icon in the top left hand side, and selecting the spacer, and dragging it in a above our text. Now we’re going to make this section sticky, and we do that by clicking on the edit section button, clicking on the advanced tab, then clicking on motion effects, and mix to where it says sticky.
Applying Sticky Effect
Click on the drop down menu, and select top. As you can see if we scroll down the page our heading sticks. What we’re now going to do is add our CSS code, and we do that by clicking on the edit section button, going into the advanced Tab, and scrolling to the bottom to custom CSS. Now what you’re going to need to do is head over to my website where you’ll find this exact page, and copy this section of code.
Adding Custom CSS Code
Once you have copied it paste it into your custom CSS box on the left hand side. Once you have pasted it in go back over to my website, and scroll to the bottom of the page where you’ll see the CSS classes name. Now what you’re going to have to do is go back over to your website, go into the advanced tab of the section, and go into layout, and it’s this here you’ll need to paste into your CSS classes of your section.
Verifying the Text Colour Change
Once you have pasted it in the colour of your text Will Change indicating the code is working. Now you may not spot the change, but it has gone from Pure White to an off cream, so just to show you again I’m going to delete one of the letters to show you that it has changed. Depending on the colour of the background it depends on how much the colour of the text changes.
Previewing the Page
Now all that’s left to do is preview the page, and we do that by clicking on the preview button next to the publish button in the bottom left hand side. Once the preview page has loaded all that’s left to do is scroll down our page, and you’ll notice the colour will change of our text over each section, and this also works over the top of our images. Remember you don’t have to make the section sticky. This is just so you can see it in full effect. This could quite easily be text over a static background or a static hero image.
Customizing and Using Elementor Pro
However you decide to use it it’s entirely up to you, but you will need Elementor Pro to be able to use the CSS function in Elementor. If you haven’t got Elementor Pro there is a link in the top of the description below is an affiliate link. It doesn’t cost you any more to use, but it does give me a very small percentage of Elementor’s profits if you choose to sign up. Hopefully you have found this video useful. If you have any questions please feel free to drop them in the comments box below.
Don’t forget to hit that like And subscribe button.
Thanks for watching.
I’ll see you in the next video.
