
How To Add A Horizontal Pricing Ribbon In Elementor

How To Add A Horizontal Pricing Ribbon In Elementor
Hi guys in this Tutorial I’m going to show you how to add custom horizontal pricing ribbons to your Elementor website. It’s extremely easy to do because I’ve done all the hard work for you. So sit back, relax, hit that like And subscribe button, and let’s get into the Tutorial.
Customizing Your Pricing Table
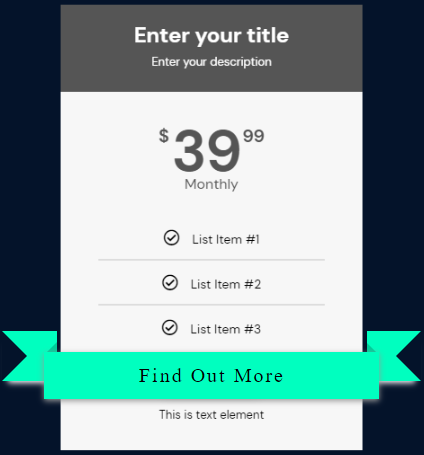
Okay guys the first thing you need to do is obviously customize your pricing table, so add all your titles, your colours, your prices, and your list items. It’s important that you do this before you move on to the next step. I’m going to leave mine just how it is just for the purpose of this Tutorial. Once you’ve added all your pricing, and your headings the next thing we’re going to do is cheat, and take a screenshot of that section. All will be explained why we’re doing it this way as we go through the video.
Uploading the Pricing Table Screenshot
Now you’re going to need to save this image, and upload it to your WordPress media gallery. Now the image of our pricing table has been uploaded we’re going to head over to our Elementor page, and we’re going to drag in a HTML widget. Now that our widget’s been added we’re going to paste in a HTML code that you can see on the screen. Once that page loads you can see there is an image of a pricing table, and this is the image we took a screenshot of earlier on.
Adding the HTML Code for the Ribbon
Now you will need to add your own image URL here so just highlight this bit of code and paste in your own. What we want to do is add what we want displayed on our ribbon. I’ve opted to leave it as by now but this is where you need to add your own text. If you want to make it a clickable link then highlight the hash and enter in your own URL.
Adding Custom CSS for the Ribbon
Now we’re going to add our CSS code, and you do that by clicking in the top left hand side, and scrolling down to the bottom, and clicking on custom CSS. You do need Elementor Pro to be able to use custom CSS. There is a link for that in the description below. You’re going to have to go back over to my website, and copy the CSS part of the code. Don’t worry I will label this clearly for you when you get to my website.
Applying the CSS Code
Now you’re going to have to go back into the image pricing table, and paste in the CSS code at the bottom. As soon as that code has been added the ribbon will get added to your HTML widget. As you can see I’ve placed it so it sits above the image button. This means it’s not just an image. It’s actually a pricing table with a function. Now you’re probably saying to yourself that you don’t want a red ribbon, and don’t worry I’m not going to leave you with that.
Customizing the Ribbon Size
I’m going to show you now how to customize the ribbon itself off. If you want to change the size of your pricing table move down to the second part of the code. Here where it says header image, and as you can see it says 310px. You can make this as big or as small as you want. If I change the image size from 310px to 210px you’ll see it’s gotten a lot smaller. If you do make the image bigger or smaller you will also need to increase the size of the ribbon.
Changing the Ribbon Colour
Now if you want to change the colour of the ribbon. All you need to do is go down into the code where it says background colour and start typing in the new colour. You want now if your Ribbon is smaller than the actual image you can make it bigger on the next line down. All you have to do is increase the width and make sure it fits around the size of the image. You can also change the padding and the margins in this section. But if you look further down in this block you can see you can change the font size.
Adjusting Font Size and Ribbon Tags
It’s currently set at 20, but you can increase it to 30. I’m going to leave this set at 20, but I am going to scroll down now, and change the colour of the tags on the actual ribbon itself. Now I’m going to scroll down to the next block of our CSS code. Where it says ribbon before, and ribbon after, and I’m going to change where it says red to yellow, and this is changing the tags on the outside of our ribbon.
Modifying Ribbon Tag Colours
As soon as we finish typing in the actual colour we want it will change automatically and underneath it says box Shadow. At the moment is set at Red. I’m going to change this to White and this is the actual shadow of our tags. This is only a small detail but it does make a big difference when you’re actually using it on the overall website. The next thing I’m going to show you how to change the colour of is the actual triangles in between our 3D ribbon. Now if you don’t know what I mean it’s this little triangle just in here now.
Changing Triangle Colours
The first one I’m going to show you how to change is the one on the right hand side. If I highlight the word black and change this to Red. You’ll notice that there’s a small red triangle on the right hand side of our ribbon. If I go up to the next block it will say black again. If I highlight this and I change it to Red you’ll see the one on the left hand side also so changes to Red the final colour.
Updating Ribbon Text Colour
I’m going to show you how to change is the colour of our text on our button and we can do that by going down to the bottom of our code where it says nav a.
Within that code it says colour black. We’re going to change this as we have before to red and as you’ll see our text has turned to Red. By using Colorzilla you can choose any colour you want for your text or your ribbon on your page. All you need to do is copy the hash colour at the bottom of the page. Wherever you want to use that colour on your Ribbon you can just copy it and paste it in now.
Modifying Ribbon Text and URL
The final thing I’m going to show you is how to change the text on your ribbon and you do that by going into the content tab in the top left hand side where it says buy now. We’re going to highlight this and start typing in the text we want to be displayed within our ribbon. I’m simply going to type in here find out more now we want to add the URL so when people click on our button. It sends them to another page on our site and we can do that by Looking In our code for the word href.
Setting the Clickable URL
When we find that we can see there’s a small hash that follows it if we put in our new URL.
We can send our customers to that page so for the purpose of this Tutorial I am only going to be sending out customers who click on the button to Google. Once I’ve finished typing in the address I’m going to preview our page and you do that by clicking on the I next to the publish button. Once our page loads you’ll see that our pricing tables has loaded and if we click on the button it will send us to Google. Now you still might be wondering why I used an image instead of a pricing table within Elementor.
Explaining the Image-Based Approach
This is simple because if we had used a HTML widget, and we tried to wrap it around a pricing widget. It wouldn’t have actually made a 3d effect. All that happened is our ribbon would have sat on top of our pricing table. The way we have it now wraps around it, and creates that 3d effect instead of sitting on top, and looking wrong.
Elementor Pro
Now that’s it for this Tutorial remember if you do want to be able to use CSS Within Elementor you do need Elementor Pro. If you haven’t got Elemental Pro there is a link at the top of the description in.
Any of Elementor’s profits if you choose to sign up if you have found this Tutorial useful please do hit that like And subscribe button. If you’ve got any questions come and hit me up in the comments box below or come and find me on social media.
Thanks for watching.
